Learning to MIG weld can feel tricky at first. You might wonder, What Are the Common MIG Welding Problems? because seeing sparks fly and metal melt can be exciting, but getting a good weld takes practice. It’s easy to get confused by different settings or what the metal is supposed to look like.
Don’t worry! We’ll go through the most common issues step-by-step. First, let’s look at what you’ll learn.
Key Takeaways
- You will learn about common welding mistakes beginners make.
- We will explain how to fix messy welds and avoid them in the future.
- You’ll discover simple ways to get your MIG welder set up right.
- We will cover why good metal preparation is key to a strong weld.
- You will understand how to control your welding torch for better results.
- We will help you build confidence in your welding skills.
Understanding Common MIG Welding Problems
MIG welding, or Gas Metal Arc Welding (GMAW), is a popular choice for DIYers and professionals alike because it’s generally easier to learn than other welding types. However, this doesn’t mean it’s without its challenges. New welders often run into similar issues that can be frustrating, making them question their ability. But these problems are normal, and understanding them is the first step to solving them. We’ll break down these common issues so you can get back to making great welds.
Wire Feed Speed and Voltage: The Balancing Act
One of the most common areas of confusion for beginners is setting the wire feed speed (WFS) and voltage correctly. These two settings work together to create the right arc length and heat. Think of it like a faucet and a hose: you need the right amount of water pressure (voltage) and the right flow rate (WFS) to get the job done well.
Too Much Voltage (Arc Length Too Long)
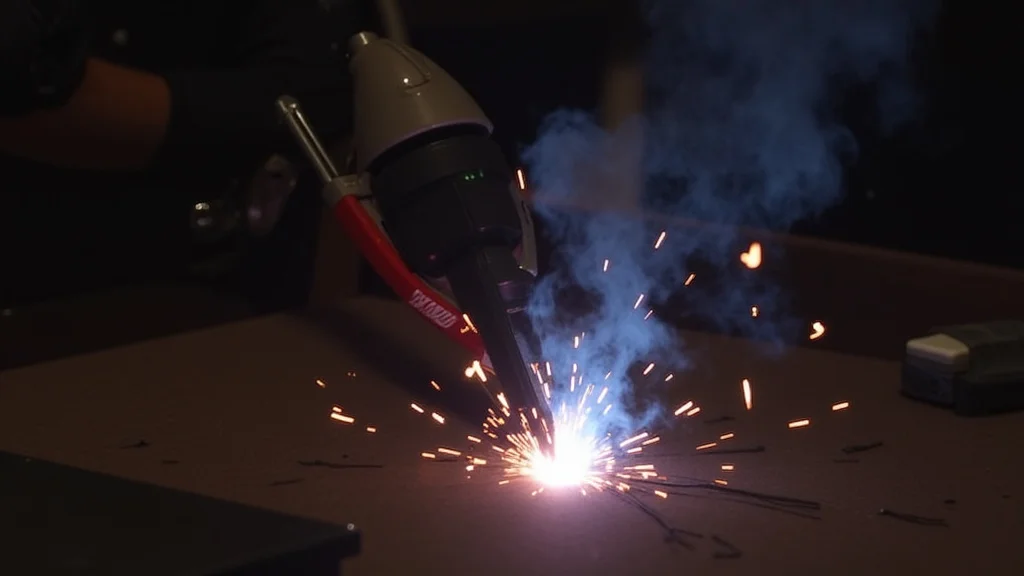
If your voltage is too high, the arc will be long and unstable. You’ll notice a lot of spatter, and the weld might look rough and uneven. The weld puddle can also be too large and hard to control, leading to a messy bead.
What it looks like: Excessive spatter, a wide and flat bead, a crackling or popping sound.
Too Little Voltage (Arc Length Too Short)
When the voltage is too low, the arc is short and “stubby.” This can cause the welding wire to hit the molten metal directly, leading to a digging or “short-circuiting” arc. You might hear a sputtering sound, and the weld bead will likely be narrow and raised, with poor penetration.
What it looks like: Little to no spatter, a narrow and ropey bead, a sputtering or “dirty” sound.
Too Much Wire Feed Speed (WFS)
If you push too much wire through the gun, you’ll get more heat and metal into the weld pool than the voltage can manage. This can lead to a large, uncontrolled puddle that spills over the joint, and the weld might be too tall and narrow, often called “worm-like.”
What it looks like: The wire seems to be feeding too fast, the weld bead is too tall and narrow, potential for undercut.
Too Little Wire Feed Speed (WFS)
When the WFS is too low, you won’t get enough filler metal into the weld. The arc will seem to wander, and the weld bead will be weak and have poor penetration. The wire might also stick to the work piece more often.
What it looks like: The wire feeds slowly, the weld bead is thin and weak, frequent wire sticking.
The Importance of Proper Gas Flow
The shielding gas in MIG welding is vital. It protects the molten weld pool from the air, which contains oxygen and nitrogen. If these elements get into the weld, they can cause defects like porosity (tiny holes) and reduce the weld’s strength.
Too Much Gas Flow
When too much gas flows from the nozzle, it can create turbulence around the arc. This turbulence can actually pull air into the weld pool, defeating the purpose of the shielding gas. You might see the weld look like it’s boiling or bubbling excessively, and porosity can occur.
What it looks like: The gas seems to be blowing around too much, a rough or bubbly weld surface, potential for porosity.
Too Little Gas Flow
If you don’t have enough gas, the weld pool won’t be adequately protected. This is a direct path to contamination from the air. You’ll likely see lots of spatter, a rough weld bead, and porous spots in your finished weld.
What it looks like: Lots of spatter, a dull or discolored weld, porous areas.
Common Weld Defects and How to Fix Them
Beyond settings, several visual issues can arise in your welds. Knowing what they are and why they happen helps you avoid them next time.
Porosity
This defect shows up as small holes or voids in the weld metal. It’s usually caused by contaminants on the metal surface (like oil, paint, or rust) or problems with the shielding gas.
Fixing it: Always clean your metal thoroughly. Ensure your shielding gas is flowing correctly and there are no drafts disturbing the gas shield.
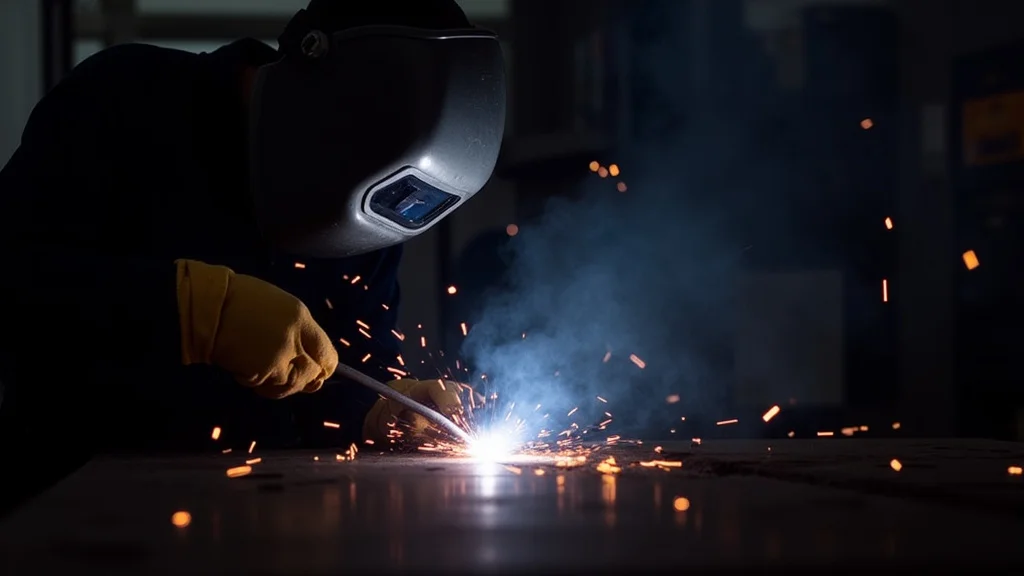
Spatter
Small droplets of molten metal that land on the base metal near the weld bead. It’s often a sign of incorrect voltage, too much WFS, or problems with the welding gun.
Fixing it: Adjust voltage and WFS. Make sure you have the correct nozzle on your gun and that it’s clean. You can also use anti-spatter spray.
Undercut
This is a groove or notch along the edge of the weld bead where it meets the base metal. It weakens the weld because it reduces the thickness of the base metal at that point. It’s often caused by too much voltage, too much WFS, or moving too quickly.
Fixing it: Slow down your travel speed. Reduce voltage slightly and ensure your wire feed speed is appropriate for the metal thickness.
Lack of Fusion / Incomplete Penetration
Lack of fusion means the weld metal didn’t properly bond with the base metal. Incomplete penetration means the weld didn’t go deep enough into the joint to create a strong bond. Both are often caused by too little voltage, too little WFS, or moving too fast.
Fixing it: Increase voltage and WFS. Slow your travel speed. Ensure you are using the correct technique to heat the joint adequately.
Warping and Distortion
When welding, the heat can cause metal to expand and then contract as it cools, leading to bending or warping. This is more common on thinner metals.
Fixing it: Use the lowest heat possible for the job. Weld in short bursts and let the metal cool between passes. Consider clamping the pieces securely to a sturdy surface.
Metal Preparation: The Unsung Hero
You can have the best MIG welder and settings in the world, but if your metal isn’t clean, your welds will suffer. Dirt, oil, rust, paint, and even a thin layer of mill scale can cause all sorts of problems, from spatter to porosity and weak welds.
Cleaning Your Metal
Always start with clean metal. Use a wire brush, grinder, or chemical cleaner to remove any contaminants. For steel, a clean surface will be a shiny, grey color.
Understanding Different Metals
Different metals require different approaches. Steel is common, but you might also weld aluminum or stainless steel. Each has specific filler wires, shielding gases, and settings. For instance, aluminum welding requires a different type of wire and often a different gas.
Torch Angle and Travel Speed
How you hold and move your welding torch is just as important as your machine settings.
Torch Angle
For most steel welding, you’ll want to hold the torch at a slight angle, usually pulling the torch (drag technique) rather than pushing. A common angle is about 10-15 degrees in the direction of travel. This helps push the shielding gas over the weld puddle and creates a cleaner, more stable arc.
Travel Speed
Moving too fast will result in poor penetration and a narrow, weak bead. Moving too slow can lead to excessive heat, wider beads, and potential undercut. You’re looking for a steady pace that creates a consistent bead width and good fusion. The weld puddle should be about the size of a dime or nickel.
Common MIG Welder Setup Issues
Sometimes, the problem isn’t your technique but how the welder itself is set up.
Incorrect Liner
The liner is a coiled wire inside your MIG gun’s cable that guides the welding wire. If it’s kinked, damaged, or the wrong size for your wire, it can cause inconsistent wire feeding, bird nesting (wire tangling inside the gun), and poor electrical contact.
Dirty or Worn Nozzle and Contact Tip
The nozzle directs the shielding gas, and the contact tip delivers the electricity to the wire. If either is clogged with spatter or worn down, it will cause problems with gas flow, arc stability, and wire feeding. Regularly clean or replace them.
Ground Clamp Connection
A good, solid connection with your ground clamp is essential for completing the electrical circuit. A loose or dirty ground clamp can lead to an unstable arc and poor weld quality. Always attach the clamp to clean metal.
Frequently Asked Questions
Question: What is the most common mistake beginners make with MIG welding?
Answer: Beginners often struggle with finding the right balance between wire feed speed and voltage. They might also forget to clean their metal properly before welding.
Question: How can I stop my MIG welds from looking messy and uneven?
Answer: Work on controlling your travel speed and torch angle. Consistent movement and a slight drag angle usually create a smoother bead. Also, ensure your settings are appropriate for the metal thickness.
Question: Why do I get so much spatter when I MIG weld?
Answer: Excessive spatter is usually caused by incorrect voltage (too high), too much wire feed speed, or poor grounding. Make sure your contact tip is clean and the correct size for your wire.
Question: What should I do if my MIG wire keeps getting tangled or stuck in the gun?
Answer: This is often a sign of a kinked liner, a dirty or worn contact tip, or using the wrong size wire for your setup. Check and clean or replace your liner and contact tip.
Question: How important is cleaning the metal before MIG welding?
Answer: It is very important. Even a thin layer of dirt, oil, or rust can cause welding defects like porosity and weak welds. Always clean your metal thoroughly.
Final Thoughts
Tackling What Are the Common MIG Welding Problems? becomes much easier when you know what to look for. Issues like improper settings, poor gas flow, dirty metal, and incorrect torch movement are all part of the learning process. By focusing on clean preparation, understanding the balance of wire speed and voltage, and practicing consistent torch control, you can overcome these common hurdles.
Each weld is a chance to learn and improve. Keep practicing these simple fixes, and you’ll build skill and confidence with every project.