Many folks find figuring out How to Set Proper Gas Flow for Aluminum Welding a bit tricky at first. It’s not as simple as just turning a knob. But don’t worry, it’s easier than you think!
We’ll break it down step-by-step so you can get it right. Stick around, and we’ll help you get those perfect welds.
Key Takeaways
- Understand why proper gas flow is important for aluminum welding.
- Learn how to choose the correct shielding gas for aluminum.
- Discover the recommended gas flow rates for different welding situations.
- Identify common problems caused by incorrect gas flow.
- Get tips for troubleshooting gas flow issues.
- Know how to check your gas flow meter accurately.
Why Gas Flow Matters for Aluminum Welding
Welding aluminum can be a bit different from welding steel. One of the biggest reasons is that aluminum oxidizes very easily. This oxide layer has a much higher melting point than the aluminum itself.
If you don’t get rid of it properly, it can cause all sorts of problems, like inclusions or weak welds.
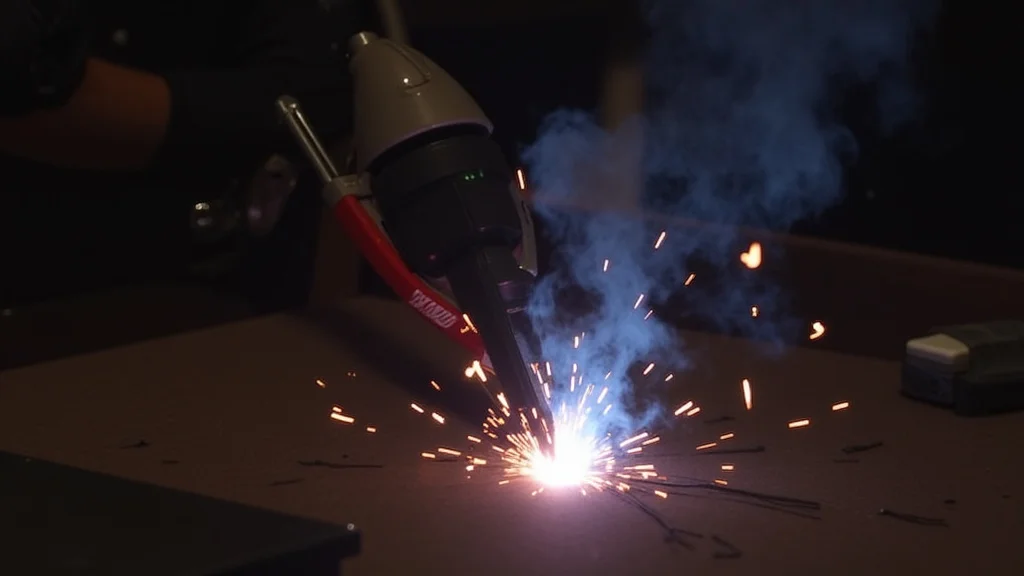
This is where your shielding gas comes in. It’s not just there to make pretty welds. Its main job is to protect that hot, molten puddle of aluminum from the air around it.
Air has oxygen and nitrogen, which can react with the molten metal and create defects. A good gas flow pushes all that bad stuff away.
Getting the gas flow right helps create a clean, solid weld. It prevents porosity (little holes in the weld), improves penetration (how deep the weld goes), and gives you a shiny, clean-looking bead. When the gas flow is too low, you risk contamination.
When it’s too high, it can cause turbulence, pulling air into the weld or blowing the shielding gas away. So, it’s all about finding that sweet spot.
Choosing the Right Shielding Gas
For aluminum welding, the most common shielding gas is pure argon. Argon is an inert gas, meaning it doesn’t react with the metal. It’s great at displacing air and protecting the weld pool.
Most aluminum welding jobs, especially with TIG (Tungsten Inert Gas) welding, use 100% argon.
Sometimes, especially for thicker aluminum or specific applications, you might see blends. These often include a small percentage of helium mixed with argon. Helium helps to increase the heat input, which can be useful for speeding up welding on thicker materials or for achieving a wider bead.
However, for beginners, sticking with 100% argon is usually the best and simplest choice.
Why not CO2 or C25 (75% argon, 25% CO2)? These gases are great for steel, but they contain active elements (like oxygen in CO2) that will react badly with aluminum. They will cause oxidation and lead to poor weld quality.
So, remember: for aluminum, think inert gases like argon and sometimes helium.
Understanding Gas Flow Rates
The gas flow rate is measured in cubic feet per hour (CFH) or liters per minute (LPM). This tells you how much gas is coming out of your torch. The right rate depends on a few things:
- Torch Size: Larger torches need more gas to cover a wider area.
- Amperage: Higher amperage means a bigger, hotter weld puddle, which needs more protection.
- Welding Position: Out-of-position welding might require slightly different flow rates.
- Environmental Conditions: Drafty areas might need more gas to fight off air currents.
A general rule of thumb for TIG welding aluminum with a standard setup (like a #8 cup) is around 20-30 CFH (which is about 9-14 LPM). For MIG (Metal Inert Gas) welding, the rates might be a little higher, often in the 25-35 CFH (12-16 LPM) range, again depending on the specific equipment and wire size.
It’s always a good idea to check your welding machine’s manual or your torch manufacturer’s recommendations. They often provide starting points for gas flow rates based on the type of welding and materials you’re using.
How to Set Your Gas Flow
Setting your gas flow usually involves a flowmeter attached to your gas cylinder and possibly a regulator on your welding machine. Here’s a simple way to think about it:
Using a Flowmeter/Regulator
Most welding setups have a regulator attached to the gas bottle. This device has a gauge that shows the pressure in the bottle and another part that controls the gas flow. For TIG welding, you’ll often have a flowmeter that shows CFH or LPM.
For MIG welding, the regulator might have a gauge for pressure, and the machine itself might have a control for the wire feed speed, which also influences gas flow.
Step 1: Connect the Gas Cylinder. Make sure the cylinder valve is fully closed. Then, carefully screw the regulator onto the cylinder valve. Hand-tighten it, then give it a slight snug with a wrench if needed, but don’t over-tighten.
Step 2: Open the Cylinder Valve SLOWLY. Stand to the side of the regulator when you open the cylinder valve. Open it all the way. You should see the pressure gauge on the regulator increase.
Step 3: Adjust the Flowmeter (if applicable). If you have a separate flowmeter, you’ll see a small ball inside a glass tube. Turn the adjustment knob on the regulator or flowmeter to raise or lower the ball to your desired CFH or LPM. Start with the recommended range (e.g., 20-25 CFH for TIG).
Step 4: Check for Leaks. A good way to check for leaks is to close the cylinder valve and watch the gauges. If they drop quickly, you likely have a leak. You can also use a soapy water solution on the connections – bubbles will show you where the gas is escaping.
Step 5: Set Your Welding Machine. For MIG, ensure your wire feed speed and voltage are set correctly. These often work together with the gas flow. For TIG, the main adjustment is your flowmeter.
What to Watch For While Welding
Once you start welding, pay attention to how the gas is behaving. You want to see a steady, consistent stream of gas coming out of the torch nozzle. If you see the shielding gas “blowing back” or getting disturbed easily, your flow might be too high, or you might have a draft.
A common test is to place your hand near the torch nozzle (without the arc running) and feel the gas flow. You should feel a steady stream, but it shouldn’t be so strong that it feels like it’s pushing your hand away violently. It should be a gentle but firm flow.
Another way to tell if your gas flow is right is by looking at the weld. If you’re getting a shiny, clean bead with no discoloration or porosity, your gas flow is likely good. If you see darkening (like a rainbow or brown tint) on the metal around the weld, or if you see little holes (porosity) in the weld itself, your gas flow might be too low, or you might be experiencing contamination.
Common Problems with Gas Flow and How to Fix Them
Even with the best intentions, you can run into issues. Here are some common problems and their solutions:
Problem: Porosity in the Weld
Cause: Gas flow is too low, or there are drafts disturbing the shielding gas. Contaminated base metal or filler material can also cause porosity.
Solution: Increase the gas flow rate on your flowmeter. Ensure you are not welding in a drafty area. Check that your base metal and filler wire are clean and free of oil, grease, or oxides.
Problem: Weld Discoloration (Black or Rainbow Tints)
Cause: Inadequate shielding gas. The metal is oxidizing as it cools.
Solution: Increase the gas flow rate. Check your torch setup and make sure the gas diffuser is in good condition and not cracked. Ensure the nozzle is the correct size for your cup.
Problem: Tungsten Contamination (for TIG)
Cause: The tungsten electrode dipped into the weld puddle, or the gas flow was too low, allowing the atmosphere to reach the tungsten.
Solution: Increase gas flow. Be careful not to let the tungsten touch the weld. Maintain a consistent arc length.
Problem: Wire Stubbing (for MIG)
Cause: Wire feed speed is too high for the voltage, or gas flow is insufficient, causing the arc to be unstable and the wire to hit the puddle.
Solution: Adjust wire feed speed and voltage to match. Ensure adequate gas flow. Check the contact tip for wear or damage.
Problem: Gas Leaks
Cause: Loose connections, damaged hoses, or a faulty regulator/flowmeter.
Solution: Use soapy water to find and tighten leaks. Replace any damaged hoses or parts. Turn off the gas at the cylinder when not in use and after checking for leaks.
Checking Your Gas Flow Meter
It’s a good idea to periodically check your flowmeter to make sure it’s working correctly. Here’s how:
- With the gas cylinder valve fully open and the welding machine turned off (no arc), set your flowmeter to a typical setting, say 25 CFH.
- Watch the ball in the flowmeter tube. It should be steady and not bouncing erratically.
- If you have a TIG torch, remove the cup from the end of the torch head. Turn on the gas for a few seconds. You should see a good, steady stream of gas coming out. If the flow is weak or inconsistent, there might be a blockage in the torch liner, diffuser, or the regulator itself.
- For MIG, you can do a similar test with the gas nozzle removed. You should see a consistent flow of gas.
- Always reattach the cup or nozzle securely after testing.
A malfunctioning flowmeter can lead to inconsistent gas flow, which directly impacts weld quality. Regular checks help prevent issues before they become major problems.
Troubleshooting Tips for Common Aluminum Welding Challenges
Beyond basic gas flow, other factors can influence your welds. Here are a few things to consider:
- Cleanliness is Key: Always clean your aluminum thoroughly before welding. Use a stainless steel wire brush dedicated only to aluminum. Remove any oil, grease, or paint. This removes the oxide layer and helps ensure good fusion.
- TIG Torch Angle: For TIG, hold your torch at a slight angle (about 10-15 degrees) in the direction of travel. This helps direct the shielding gas effectively over the weld puddle and prevents turbulence.
- MIG Contact Tip: Make sure the contact tip in your MIG gun is clean and the correct size for your wire. A dirty or worn tip can restrict gas flow or cause arc instability.
- Drafts: Welding outdoors or in areas with fans can create drafts. These can blow your shielding gas away, leading to contamination. Try to shield your work area from wind.
- Back Purging: For certain aluminum welding jobs, especially on tubes or tanks, you might need to “back purge.” This means sending shielding gas to the backside of the weld joint as well. This is critical for preventing oxidation on the root side of the weld.
Remember that practice makes perfect. The more you weld and experiment with your settings, the better you’ll become at recognizing what a good weld looks and sounds like, and how to adjust your gas flow to achieve it.
Frequently Asked Questions
Question: What is the best gas flow rate for 1/8 inch aluminum TIG welding?
Answer: For 1/8 inch thick aluminum using TIG welding with a standard setup, a good starting point for gas flow is around 20-25 CFH (approximately 9-12 LPM). You may need to adjust slightly based on torch angle and environmental conditions.
Question: Can I use a MIG welder with a gas bottle for aluminum?
Answer: Yes, absolutely. MIG welding is a very common way to weld aluminum. You’ll need a spool gun or a push-pull gun for aluminum wire, and you’ll use a shielding gas like 100% argon or an argon-helium mix.
Question: How do I know if my gas flow is too high for aluminum welding?
Answer: If your gas flow is too high, you might notice turbulence that can actually pull air into the weld, causing porosity. You might also see the shielding gas blowing away from the weld puddle. The weld area might also appear to be blowing around too much.
Question: Does the type of cup on my TIG torch affect gas flow?
Answer: Yes, it does. Larger cups provide a wider coverage area for the shielding gas, which is good for keeping the weld puddle protected. The cup’s shape and size influence how well the gas flows over the weld.
Question: My TIG welds on aluminum are looking dull and dirty. What could be the problem?
Answer: This is often a sign of poor shielding gas coverage. Your gas flow rate might be too low, or there could be a draft. Ensure your gas is flowing correctly and that there are no drafts blowing the gas away from the weld puddle.
Final Thoughts
Getting How to Set Proper Gas Flow for Aluminum Welding right is about protection and consistency. You want enough gas to keep oxygen out but not so much that it causes problems. A good flow rate for TIG on aluminum is usually between 20-30 CFH, and for MIG, it’s often a bit higher.
Always start with recommendations, but watch your welds and adjust as needed. Cleanliness and steady hands help too. Keep practicing, and you’ll see much better results with your aluminum projects.