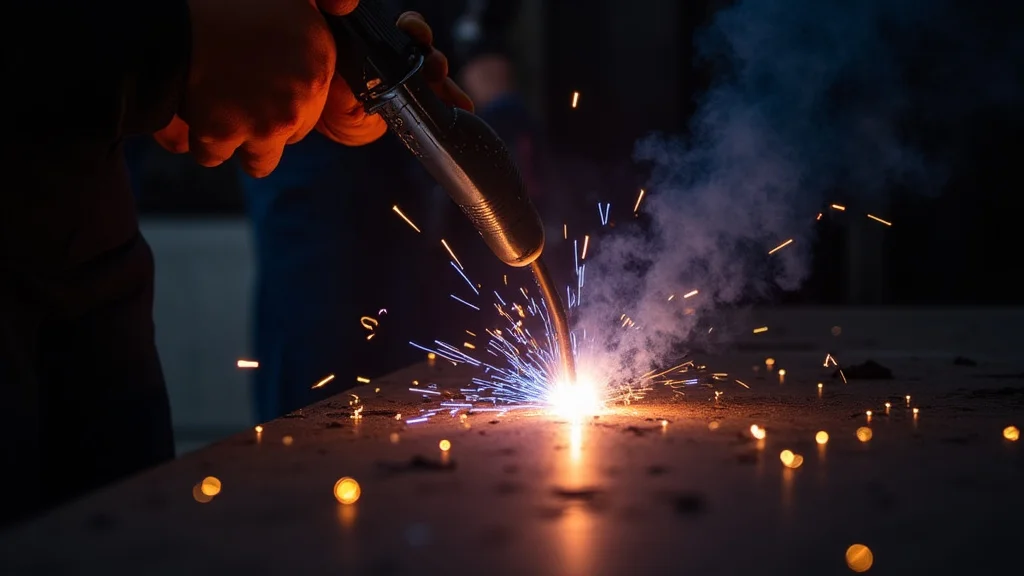
Have you ever fired up your MIG welder, ready to make some sparks fly, only to find a nasty little hole burned through your metal? That’s called burnback, and it’s a super common issue when you’re starting out. It can be frustrating, but don’t worry!
We’ll show you exactly How Do You Reduce Burnback in MIG Welding? with some simple, easy-to-follow steps. Get ready to fix this problem and make your welds look great.
Key Takeaways
- Burnback happens when the wire melts too far back, sticking to the tip.
- Proper voltage and wire speed settings are key to preventing burnback.
- Too much stickout can also cause burnback issues.
- Maintaining your MIG gun tip is important for good welds and fewer problems.
- Checking your gas flow can help avoid burnback.
- Simple adjustments can make a big difference in preventing burnback.
What is Burnback in MIG Welding?
Burnback is when the welding wire melts too far back inside the MIG gun nozzle, often sticking to the contact tip. Imagine your MIG welder shooting out hot wire to melt metal. If things aren’t set just right, that wire can melt all the way back to the tip itself.
This creates a messy blob and can even fuse the wire to the tip, making it hard to weld.
It’s a common problem for beginners because there are a few different things that can cause it. Getting the settings dialed in takes a little practice. But once you know what to look for, it’s actually pretty easy to fix and prevent.
Why Does Burnback Happen?
Several things can lead to burnback. The most common culprits are settings on your welder and how you’re holding the gun.
Voltage and Wire Speed Settings
Your MIG welder has two main controls: voltage and wire speed. They work together to create the right amount of heat and metal transfer. When these are out of whack, burnback is more likely.
Wire Speed: This controls how fast the welding wire feeds out of the gun. If the wire feeds too slowly for the amount of heat you’re putting into the metal, it can melt too far back. It’s like trying to push too much cheese through a slow grater; it just melts before it can get out.
Voltage: Voltage is all about the heat. A higher voltage means more heat. If your voltage is too high for the wire speed you’re using, the wire will melt too quickly, leading to burnback.
It’s like turning up the stove too high for a thin piece of cheese; it melts too fast.
Wire Stickout
Wire stickout is the length of welding wire that sticks out past the contact tip when you’re not welding. A little bit of stickout is normal, but too much can cause problems.
When you have too much wire sticking out, it acts like a long wick on a candle. The heat from the arc travels back up the wire more easily. This extra heat can cause the wire to melt too far back, right at or inside the contact tip.
Aim for a consistent stickout, usually about 1/4 to 1/2 inch, for best results.
Machine Ground Connection
A poor ground connection can mess up your welder’s settings and how it heats the metal. If the connection isn’t solid, the electrical current can be inconsistent. This can lead to too much heat being concentrated in one spot, causing the wire to melt back too far.
Always make sure your ground clamp is attached to clean, bare metal. Scrape away any paint, rust, or dirt. A clean connection ensures a steady flow of electricity for a stable arc.
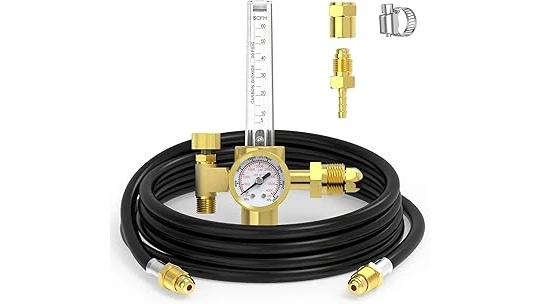
Gas Flow Issues
The shielding gas in MIG welding protects your molten weld pool from the air. If your gas flow is too low or inconsistent, it can cause welding defects and also contribute to burnback.
When the gas flow is weak, the arc isn’t properly shielded. This can lead to a more unstable arc and hotter metal transfer. The wire might melt back too far because the arc isn’t behaving as it should.
Make sure your gas cylinder valve is open and the regulator is set to the correct flow rate for your application (usually between 15-25 cubic feet per hour, or CFH).
How Do You Reduce Burnback in MIG Welding? Step-by-Step Fixes
Now that you know why burnback happens, let’s look at how to stop it. These are simple fixes you can try right away.
1. Adjust Your Wire Speed and Voltage
This is the most important step. You need to find the sweet spot where your settings work together.
If you have burnback: Try increasing your wire speed first. This feeds more wire out, which can help pull the melting point further away from the tip. If increasing wire speed doesn’t help enough, you might need to slightly decrease your voltage.
A little less heat can prevent the wire from melting too fast.
General Guideline: For thinner metals, you’ll use lower voltage and wire speed. For thicker metals, you’ll use higher voltage and wire speed. Always start with the manufacturer’s recommended settings for your material thickness and wire size.
Then, fine-tune from there.
Here’s a quick way to think about it:
- Burnback = Too much heat for wire feed.
- Fix: Feed wire faster OR reduce heat (voltage).
2. Check and Adjust Wire Stickout
Keep your wire stickout consistent and shorter.
Action: After you finish a weld or if the wire is sticking out too far, trim it back to about 1/4 to 1/2 inch before starting your next weld. You can do this by pulling the trigger and letting the wire feed out slightly, then quickly pressing the trigger and letting go to let it “short circuit” off the metal or a scrap piece.
A shorter stickout keeps the heat from traveling back up the wire as easily, so the wire melts right at the tip of the metal you’re joining.
3. Ensure a Solid Ground Connection
A good ground is non-negotiable for any welding.
Action: Before you start welding, clean the area where you’ll attach the ground clamp. Use a wire brush or sandpaper to remove any paint, rust, oil, or debris. Make sure the clamp is tight and has good contact with the metal.
A clean ground means a stable arc and consistent heat, which helps prevent unexpected burnback.
4. Verify Gas Flow
Proper shielding gas is crucial.
Action: Turn on your gas cylinder valve. Check the flow rate on your regulator. A common starting point is 15-25 CFH.
You can do a quick check by briefly pulling the trigger (without striking an arc) and feeling the gas flow out of the nozzle. You should feel a steady stream. If your gas is running low, change the cylinder.
Good gas flow helps maintain a stable arc and prevent issues that can lead to burnback.
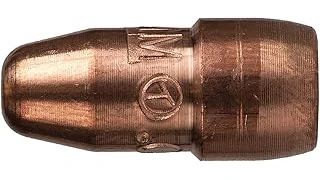
5. Inspect Your Contact Tip
The contact tip is where the wire passes through and makes electrical contact. If it’s damaged or dirty, it can cause problems.
Action: Sometimes, burnback can damage the tip, making the hole larger or misshapen. If you see any damage,
A clean, undamaged tip ensures smooth wire feeding and a consistent arc.
6. Check for Wire Feed Issues
If your wire isn’t feeding smoothly, it can lead to inconsistent melting and burnback.
Action: Make sure the drive rollers in your wire feeder are clean and properly tensioned. Check that the liner inside your MIG gun is not kinked or obstructed. A smooth wire path is essential for consistent welding.
Troubleshooting Table: Burnback Issues
Sometimes a quick reference is helpful. This table shows common burnback signs and what to check.
| Problem Sign | Possible Cause | What to Check/Adjust |
|---|---|---|
| Wire melts to contact tip and sticks. | Wire speed too low for voltage. | Increase wire speed slightly. |
| Wire melts to contact tip and sticks. | Voltage too high for wire speed. | Decrease voltage slightly. |
| Wire melts to contact tip and sticks. | Wire stickout too long. | Reduce wire stickout to 1/4-1/2 inch. |
| Wire melts to contact tip and sticks. | Dirty or damaged contact tip. | Clean or replace the contact tip. |
| Inconsistent arc, leading to burnback. | Poor ground connection. | Clean and tighten ground clamp. |
| Inconsistent arc, leading to burnback. | Insufficient gas flow. | Check and adjust gas flow rate. |
Frequently Asked Questions
Question: What is the most common cause of burnback for beginner welders?
Answer: The most common cause for beginners is incorrect voltage and wire speed settings. They often don’t realize how these two settings need to work together.
Question: Can I fix a contact tip that has burnback fused to it?
Answer: Sometimes you can clean off light spatter, but if the wire is severely fused, it’s best to replace the contact tip. They are inexpensive.
Question: How much wire stickout is too much?
Answer: Generally, anything more than about 3/4 of an inch is likely too much and can lead to burnback and other arc issues.
Question: Will changing my gas pressure fix burnback?
Answer: Gas pressure (flow rate) is important for shielding, but it’s not usually the primary cause of burnback. Focus on voltage and wire speed first, then check gas.
Question: Should I adjust voltage or wire speed first to fix burnback?
Answer: It’s often best to adjust wire speed first. Increasing wire speed feeds more metal, which can counteract the melting. If that doesn’t work, then make small adjustments to voltage.
Final Thoughts
Fixing burnback in MIG welding is all about getting your settings right and paying attention to a few key details. Remember to balance your wire speed and voltage – they are best friends for a good weld. Keep your wire stickout short and consistent, and always make sure your ground clamp is clean and tight.
Don’t forget to check your shielding gas flow and keep your contact tip clean. By making these simple adjustments, you’ll see a big improvement in your welds and say goodbye to frustrating burnback.
Leave a Reply