Figuring out How Do You Adjust Wire Feed Speed for MIG Welders? can seem tricky at first. Lots of people learning MIG welding find this part confusing. It’s like tuning a radio to get the perfect sound.
But don’t worry! We’ll make it super simple. We’ll go step-by-step so you can get it right every time.
Ready to learn how to dial in your welds? Let’s get started.
Key Takeaways
- Wire feed speed controls how fast the welding wire comes out of the MIG gun.
- Matching wire feed speed to voltage and gas flow is key for good welds.
- Too slow a wire feed speed causes a weak, sputtering arc.
- Too fast a wire feed speed results in a loud, spattery arc and too much heat.
- You’ll learn how to listen to and look at your arc to make adjustments.
- Finding the right setting is a skill that gets easier with practice.
Understanding Wire Feed Speed
What is Wire Feed Speed?
Wire feed speed, often called WFS, is a setting on your MIG welder. It tells the machine how fast to push the welding wire out of the gun. Think of it like a conveyor belt for your metal wire.
The faster the belt moves, the more wire comes out to melt and create your weld.
This speed is usually measured in inches per minute (IPM) or meters per minute (MPM). Most beginner welders will see IPM on their machines. It’s one of the most important settings you’ll adjust for MIG welding.
Why Wire Feed Speed Matters
Wire feed speed works together with voltage. These two settings are the main controls for your MIG arc. The wire feed speed controls the amperage, or the amount of electrical current.
The voltage controls the arc length. Getting these two dialed in is crucial for a stable, clean weld.
If your wire feed speed is too low, you won’t have enough metal filling the weld pool. This can lead to a weak weld that looks like it’s sputtering. If it’s too high, you’ll be feeding too much wire.
This can cause excessive heat, a loud and messy arc, and lots of spatter.
The Relationship Between Wire Feed Speed and Voltage
It’s important to understand that wire feed speed and voltage are linked. They don’t work alone. For each type of wire and gas you use, there’s a sweet spot where they work best together.
Generally, if you increase your wire feed speed, you’ll want to increase your voltage slightly. This helps to melt the extra wire you’re feeding. If you decrease your wire feed speed, you might need to lower your voltage to match.
This keeps the arc length consistent and prevents the weld from becoming too cold or too hot.
How to Find the Right Wire Feed Speed
Start with a Reference Chart
Many welder manufacturers provide reference charts. These charts are usually in the welder’s manual or on the inside of the machine’s cover. They suggest starting settings for different types and thicknesses of metal.
These charts are a fantastic place to begin.
Look for the chart that matches the wire you’re using (like .030″ or .035″ solid wire) and the type of shielding gas you have (like 75% Argon / 25% CO2). Find the thickness of the metal you’re welding, and the chart will give you a recommended wire feed speed and voltage.
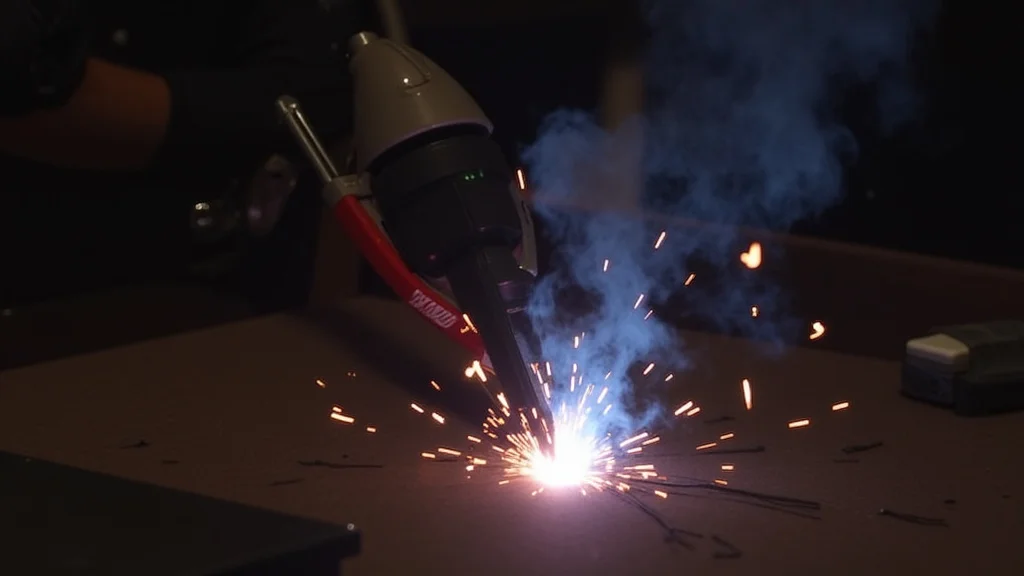
Listening to Your Arc
Once you have a starting point from a chart, it’s time to listen. Your welding arc will tell you a lot if you pay attention. This is one of the best ways to fine-tune your settings.
A good MIG arc should sound like a steady sizzle, almost like bacon frying. It should be a consistent sound without pops or crackles. If it sounds like a rapid fire machine gun, your wire feed speed is likely too high.
If it sounds weak and spattery, with long pauses between pops, your wire feed speed is probably too low.
Looking at Your Weld Pool and Spatter
Your eyes are just as important as your ears. Watch the molten weld pool as you lay down a bead. Also, observe the amount of spatter.
Spatter is the small droplets of molten metal that fly off the arc.
If your wire feed speed is too high, you’ll likely see a lot of spatter. The weld pool might look rough and uncontrolled. The arc might seem unstable and “angry.”
If your wire feed speed is too low, the weld pool might not be filling in properly. You could see a thin, weak bead. The arc might look like it’s struggling to stay lit, with gaps or long, sputtering sounds.
Making Adjustments
When you start welding with your initial settings, see what you hear and observe. Then, make small adjustments. It’s better to make small changes than big ones.
If the arc sounds too fast and spattery, turn the wire feed speed down a little. If it sounds weak and sputtering, turn the wire feed speed up a bit.
Remember to adjust voltage along with wire feed speed. If you increase WFS, you might need to increase voltage. If you decrease WFS, you might need to decrease voltage.
Keep the arc length and sound consistent.
Common Problems and How to Fix Them
Problem: Arc sounds like a machine gun and there’s a lot of spatter.
Cause: Wire feed speed is too high. You are feeding too much wire for the amount of heat. Voltage might also be a bit low for the amount of wire.
Fix: Turn down the wire feed speed. Listen to the arc. You may need to slightly decrease voltage as well, or increase it slightly depending on the overall arc length and sound.
Problem: Arc is weak, sputtering, and sounds like a weak pop-pop-pop.
Cause: Wire feed speed is too low. Not enough wire is being fed to create a strong, stable arc. Voltage might also be too high for the low wire speed.
Fix: Turn up the wire feed speed. Listen for that steady sizzle. You may need to slightly increase voltage as well to match the increased wire feed.
Aim for a smooth, consistent sound.
Problem: Weld bead is too narrow and doesn’t penetrate well.
Cause: Often related to wire feed speed being too low. You’re not getting enough metal into the joint. Voltage might also be too low.
Fix: Increase wire feed speed. Check your voltage setting too, and make sure it’s balanced with the WFS. You want enough heat to fuse the metals.
Problem: Weld bead is too wide, flat, and looks like it’s overheating.
Cause: Wire feed speed is too high. You’re feeding too much material and heat. Voltage might be too high for the amount of wire.
Fix: Decrease wire feed speed. Consider lowering voltage slightly to balance the arc. You want a nice, rounded bead, not a flat, washed-out one.
Adjusting for Different Materials and Wire Sizes
Different Wire Diameters
You’ll use different wire feed speeds for different wire sizes. Smaller diameter wires (like .023″ or .030″) generally require lower wire feed speeds than larger diameter wires (like .035″ or .045″). This is because smaller wires melt faster.
Always refer to your welder’s chart for starting points based on wire diameter. As you gain experience, you’ll develop a feel for how each size behaves.
Choosing the Right Gas
The type of shielding gas you use also affects your settings. For example, a 100% CO2 gas will generally run hotter and may require slightly different wire feed speed and voltage settings compared to a mix like 75% Argon / 25% CO2.
Always check your reference charts and listen to the arc. The charts provide good starting points, but the sound of the arc and the appearance of your weld are the ultimate guides.
Welding Different Thicknesses of Metal
Thicker metals need more heat and more filler material. This means you’ll typically use a higher wire feed speed and voltage for thicker steel compared to thinner steel.
Thin metals require less heat. If you use too much wire feed speed and voltage on thin metal, you’ll burn through it easily. Start with lower settings and gradually increase them until you achieve a good weld without burning holes.
Practice Makes Perfect
Don’t get discouraged if your first few welds aren’t perfect. Learning to adjust wire feed speed takes practice. The more you weld, the better you’ll get at recognizing the sounds and sights of a good arc.
Set up some scrap metal. Try different settings and see how they affect your welds. Make notes of what works best for different materials.
This hands-on experience is invaluable.
Understanding the Controls on Your Welder
Most MIG welders have two main dials or controls for power settings. One is typically labeled “Voltage” and the other is often labeled “Wire Feed Speed” or has a wire speed indicator. Some machines might have combined controls that adjust both simultaneously, but you should still be able to fine-tune them.
On some digital machines, the settings might be shown as numbers or symbols. Familiarize yourself with your specific welder’s controls. Read the manual to understand what each knob or button does.
Common Wire Feeders
Most MIG welders have a wire feeder built into the machine or a separate unit. This feeder has rollers that grip the wire and push it through the liner in your welding gun. The speed of the motor driving these rollers determines the wire feed speed.
Sometimes, the rollers can slip. If you notice that the wire feed speed seems inconsistent, check the rollers for wear or for dirt buildup. Ensure they are the correct size for your wire diameter.
Troubleshooting Common Issues
Wire Jamming
If the wire jams, it could be due to a few things. The liner in your welding gun might be kinked or blocked. The contact tip might be clogged with spatter.
Or, the drive rolls might not be set correctly for the wire size.
Ensure the liner is straight and clear. Clean out the contact tip regularly. Check that the drive rolls are properly seated and the tension is correct – not too tight, not too loose.
Inconsistent Wire Feed
An inconsistent wire feed can happen if the drive rolls are worn, dirty, or not aligned properly. It can also be caused by a damaged liner or too much tension on the spool of wire.
Inspect your drive rolls and clean them if necessary. Make sure the tension on the wire spool is set so the wire feeds smoothly but doesn’t unspool itself. Check the liner for any obstructions.
The Role of Contact Tips
The contact tip is a small brass part at the very end of your MIG gun. It’s what the wire passes through and what transfers the electrical current to the wire. The size of the contact tip must match the diameter of the wire you are using.
A worn or incorrectly sized contact tip can cause a poor electrical connection, leading to an unstable arc, spatter, and inconsistent wire feed. Keep your contact tips clean and replace them when they show signs of wear.
Shielding Gas Flow Rate
While this article is mainly about wire feed speed, it’s worth mentioning that shielding gas flow rate is also important. Too little gas won’t protect your weld from the air, leading to porosity (small holes). Too much gas can create turbulence and actually pull in air, also causing problems.
A good starting point for gas flow is usually around 20-25 CFH (cubic feet per hour) for standard Argon/CO2 mixes. You can often hear if the gas flow is too low; the arc may sound rougher. You can check the flow rate with a flowmeter on your gas cylinder.
Welding Different Positions
When welding in different positions, like overhead or vertical, you might need to make slight adjustments. For vertical up welding, you might need to slightly decrease the wire feed speed and voltage to help control the weld puddle from sagging.
For overhead welding, you might also need to reduce the wire feed speed to prevent the molten metal from dripping. These adjustments are usually minor and come with practice.
Why the Right Settings Are So Important
Getting the wire feed speed and voltage right isn’t just about making a pretty weld. It’s about creating a strong, reliable bond between two pieces of metal. A weld that looks good but is set incorrectly might be weak and fail under stress.
Correct settings ensure proper fusion, penetration, and strength. They also make your welding process smoother and more enjoyable by reducing spatter and arc instability. This saves you time on cleanup and rework.
Frequently Asked Questions
Question: What happens if my wire feed speed is too low?
Answer: If your wire feed speed is too low, the welding arc will be weak and sputtering. You’ll get poor penetration, and the weld bead might look thin and uneven. It sounds like a weak, intermittent pop.
Question: What happens if my wire feed speed is too high?
Answer: When the wire feed speed is too high, you’ll get a loud, unstable arc with a lot of spatter. The weld might be too hot, leading to burn-through on thin materials or a wide, flat bead. It sounds like a machine gun.
Question: Do I always need to use a chart for settings?
Answer: Charts are great starting points, but they are not the final answer. You should always listen to your arc and look at your weld pool to fine-tune the settings for the best results.
Question: How often should I change my wire feed speed?
Answer: You’ll change your wire feed speed whenever you change the thickness of the metal you’re welding, the type of wire you’re using, or sometimes even the gas you’re using. For the same material and wire, you often keep the settings the same.
Question: Can I adjust wire feed speed while welding?
Answer: Yes, you can make small adjustments to the wire feed speed while welding if needed. However, it’s usually best to stop, evaluate the weld, and then make adjustments for the next pass or weld. Making large changes mid-weld can cause inconsistencies.
Final Thoughts
Mastering How Do You Adjust Wire Feed Speed for MIG Welders? is a key step to becoming a confident welder. You now know that wire feed speed controls the amount of wire melted into your weld. It works hand-in-hand with voltage to create the perfect arc.
Listen to that sizzle, watch the pool, and don’t be afraid to make small tweaks. You’ve got the knowledge to find those sweet spots and make strong, clean welds. Keep practicing, and you’ll be setting your welder like a pro in no time.