If you’re new to welding, seeing burn marks from your MIG welder can be a little confusing. It’s a common hurdle that many beginners face. Don’t worry, though!
We’re going to walk through this step by step to fix those unwanted marks. Get ready to learn how to achieve cleaner welds and understand the simple fixes for the MIG Welder Burn Marks Problem? Step Solutions.
Key Takeaways
- Understand what causes MIG welder burn marks.
- Learn how to adjust your welder settings correctly.
- Discover the importance of proper wire speed and voltage.
- Find out how shielding gas affects burn marks.
- Explore techniques for better torch angle and travel speed.
- Know how to prepare your metal for welding.
What Are MIG Welder Burn Marks?
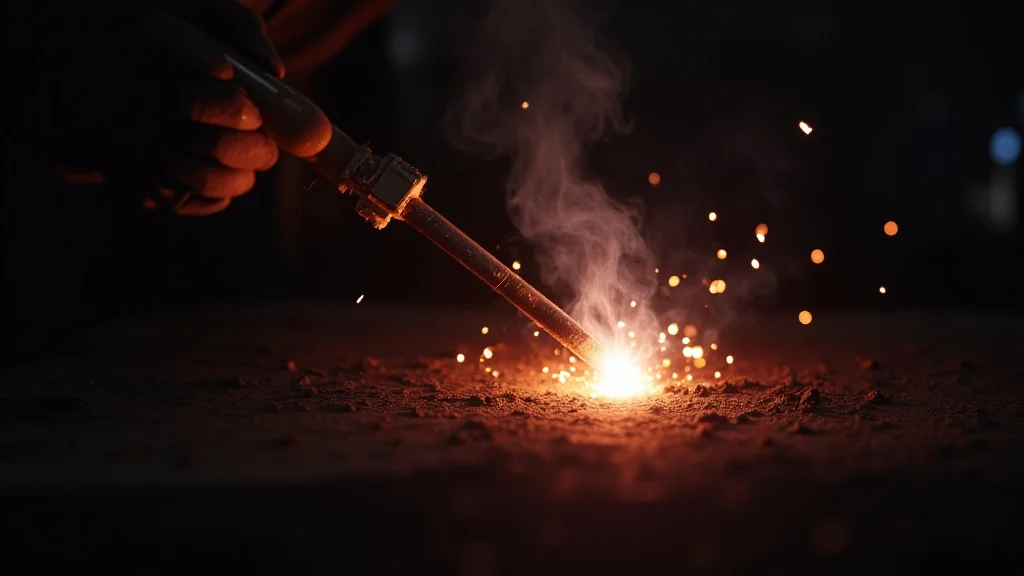
When you’re MIG welding, you might notice dark, discolored areas around your weld. These are often called burn marks or heat discoloration. They happen because the metal gets too hot in certain spots.
This can make your welds look messy and can sometimes weaken them. For folks just starting out, it’s a visual cue that something isn’t quite right with the welding process.
Why Do Burn Marks Happen?
Several things can cause these burn marks. The most common reasons are settings on your MIG welder that are too high. Think of it like cooking; if the stove is too hot, you burn your food.
The same idea applies to welding. Too much heat means the metal gets overheated.
Too Much Heat
The primary culprit is often excessive heat. This can come from a few places. Your welder settings might be dialed too high, sending too much power to the weld.
This melts more metal than you need, leading to discoloration and puffing out. It’s like using a blowtorch on a delicate piece of plastic; you’re going to melt it too much.
Wrong Settings
Your MIG welder has settings for voltage and wire speed. If these aren’t matched up right, you’ll get too much heat. The wire speed controls how fast the welding wire feeds out.
The voltage controls the arc’s power. If the wire speed is too low for the voltage, the wire melts too fast, creating a big, hot puddle. If the voltage is too high for the wire speed, the arc is too intense.
Incorrect Gas Flow
MIG welding uses a shielding gas. This gas protects the molten metal from the air. If you don’t have enough gas, or if it’s blowing away too much, oxygen can get to the hot metal.
This causes oxidation, which is what you see as discoloration or burn marks. It’s like leaving a hot piece of metal out in the rain; it can get damaged.
Metal Thickness
The thickness of the metal you’re welding also matters. Thicker metal needs more heat to melt through properly. Thinner metal needs less.
If you use the same settings on both, you’ll likely burn through or discolor the thin metal. It’s important to match your settings to the job.
Simple Solutions for Burn Marks
Fixing burn marks is usually about adjusting your MIG welder settings and technique. We’ll go through each step so you can get cleaner, better welds.
1. Adjusting Voltage and Wire Speed
This is the most important step. Your welder settings need to be in balance. Most MIG welders have a chart that suggests settings based on the thickness of the metal you’re welding.
Find this chart!
For thinner metals, you’ll want lower voltage and a slower wire speed. This creates a softer arc and less heat. For thicker metals, you can increase both.
The goal is to create a steady, controlled arc that melts just enough metal.
Experimentation is key here. Start with the recommended settings and make small adjustments. If you see too much burn-through or discoloration, try lowering the voltage first, then the wire speed. You’re looking for a nice, smooth bead that’s not too wide or puffy.
2. Checking Your Shielding Gas
Make sure your gas flow is correct. The recommended flow rate is usually around 15-25 cubic feet per hour (CFH). You can usually adjust this with a knob on your gas regulator.
Avoid drafts. If you’re welding outdoors or in a windy area, the shielding gas can get blown away. Try to set up your weld in a spot that’s protected from wind. Sometimes, a simple windbreak can make a big difference.
Check your connections. Make sure the gas hose is securely connected to both the welder and the gas bottle. A leak can reduce the amount of gas reaching your weld.
3. Controlling Your Torch Angle
The angle of your MIG torch matters. You generally want to keep your torch at a slight push angle. This means you’re pushing the gun forward slightly into the weld puddle.
Push vs. Pull. Pushing the torch generally results in a flatter, wider bead and less spatter. Pulling the torch can give you a more peaked bead but might create more burn marks and spatter if not done carefully.
For most MIG welding, a slight push is preferred.
Keep it steady. Try to keep the torch at a consistent angle throughout the weld. Jerky movements can cause uneven heat distribution and lead to burn marks.
4. Managing Travel Speed
How fast you move your MIG torch along the weld joint is also critical. If you move too slowly, you’ll deposit too much heat into one spot, causing burn-through and discoloration. If you move too quickly, you won’t get enough penetration, and the weld might be weak.
Find the sweet spot. You’re looking for a travel speed that allows the wire to melt into the base metal smoothly. The weld puddle should follow the torch, not get left behind. Listen to the sound of the arc; a steady “sizzle” is usually good.
A rapid “crackling” might mean you’re going too slow or have too much heat.
Practice makes perfect. Spend time practicing on scrap pieces of metal. Focus on keeping your speed consistent. You’ll start to feel when the speed is just right.
5. Preparing Your Metal
The surface of the metal you’re welding on can affect your weld. Rust, paint, oil, and dirt can all cause problems, including discoloration and poor weld quality.
Cleanliness is key. Always clean the metal before you start welding. Use a wire brush or a grinder to remove any rust, paint, or mill scale. If there’s oil or grease, clean it with a degreaser.
This ensures a clean, strong weld with fewer burn marks.
Consider the material. Some metals are more prone to discoloration than others. Stainless steel, for example, can easily discolor if not welded properly.
6. Choosing the Right Wire and Gas
The type of welding wire and shielding gas you use is also important. For most mild steel projects, a solid steel wire like ER70S-6 is common. The shielding gas is usually a mix of Argon and CO2, often around 75% Argon and 25% CO2.
Wire diameter. The diameter of your wire should match the thickness of the metal. Smaller wires are for thinner metals, and larger wires are for thicker metals. Using a wire that’s too large for the metal can lead to excessive heat.
Gas mix. The CO2 in the gas mix adds heat to the arc, which is good for thicker metals. For very thin metals, you might use a gas with less CO2 or even straight Argon. Always check the recommendations for your specific wire and application.
Troubleshooting Common Scenarios
Let’s look at some common situations where burn marks pop up and how to fix them.
Scenario 1: Thin Sheet Metal is Burning Through
This is a classic beginner problem. Your settings are likely too high for the thin metal. You need to reduce the heat.
- Lower Voltage: This is the first thing to try. Reduce the voltage setting on your MIG welder.
- Lower Wire Speed: If lowering the voltage isn’t enough, reduce the wire speed as well.
- Increase Travel Speed: Move the torch a bit faster.
- Torch Angle: Ensure you’re using a slight push angle.
Scenario 2: Weld Puddle is Too Wide and Flat
This often means too much heat and a wire speed that might be a bit too high for the voltage. The weld is spreading out too much.
- Slightly Reduce Voltage: Bring the voltage down just a touch.
- Slightly Reduce Wire Speed: Try matching the voltage reduction with a slight reduction in wire speed.
- Maintain Travel Speed: Don’t go too fast; you need to let the puddle form correctly.
Scenario 3: Burn Marks Are Dark and Widespread
This suggests you might not be getting enough shielding gas, or your heat is still a bit too high and the metal is oxidizing.
- Check Gas Flow: Increase your CFH slightly if it’s too low.
- Shield from Wind: If you’re in a drafty area, try to block the wind.
- Reduce Heat: Double-check your voltage and wire speed settings to make sure they aren’t excessively high for the metal thickness.
FAQ
Question: What is the main cause of burn marks when MIG welding?
Answer: The main cause is usually too much heat applied to the metal. This often comes from incorrect settings on your MIG welder, such as voltage or wire speed being too high for the metal thickness.
Question: How can I prevent burn-through on thin metal?
Answer: To prevent burn-through on thin metal, you need to reduce the heat. Lower your voltage and wire speed settings, and ensure you’re moving the torch at an appropriate travel speed. A slight push angle can also help.
Question: Does the type of shielding gas affect burn marks?
Answer: Yes, the shielding gas is important. If you don’t have enough gas, or if it’s being blown away, the hot metal can oxidize, leading to discoloration. The type of gas mix can also influence heat.
Question: Is it okay to have some burn marks on a weld?
Answer: While some minor discoloration can occur, excessive burn marks or burn-through indicate a problem. It can weaken the weld and make it look unprofessional. The goal is to minimize them for a clean, strong weld.
Question: How do I know what settings to use for different metal thicknesses?
Answer: Most MIG welders have a chart inside the welding machine or in the manual that suggests voltage and wire speed settings for various metal thicknesses. Always start with these recommendations and then make small adjustments as needed.
Final Thoughts
Dealing with MIG welder burn marks is a common learning curve. You’ve learned that too much heat is the main problem, often caused by settings that are too high. We’ve covered how adjusting voltage, wire speed, and travel speed are key to controlling heat.
You also now know the importance of your shielding gas and keeping your metal clean. By following these simple steps and practicing, you’ll get cleaner welds and feel more confident with your MIG welder. Keep experimenting and you’ll master it.
Leave a Reply