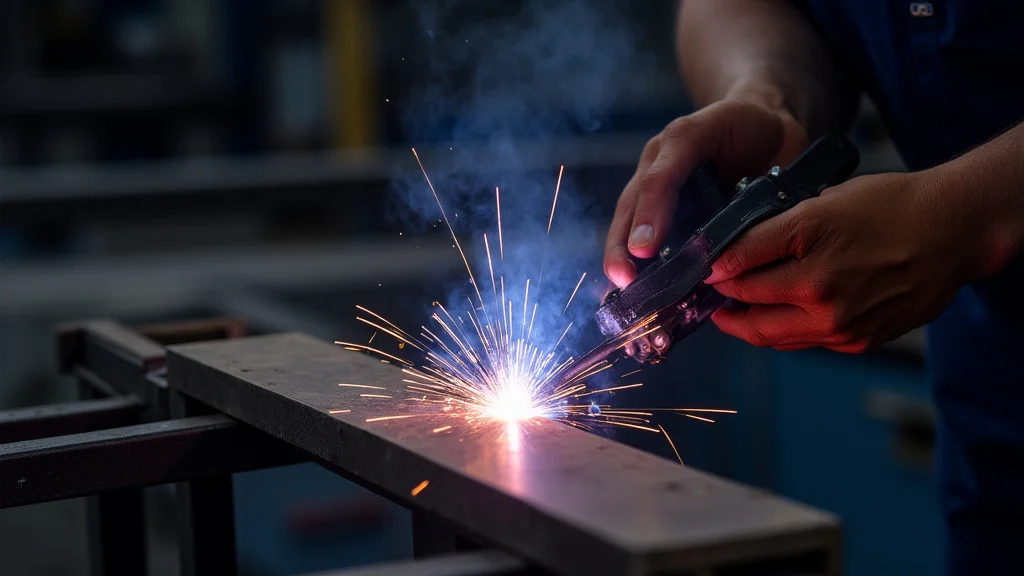
Getting a weld to look good can be tricky when you’re just starting out. You want that smooth, even look, but sometimes it just doesn’t happen. Don’t worry, How to Improve Weld Bead Appearance Quickly is something many beginners struggle with.
We’re going to break it down into easy steps. First, we’ll look at the basic things that make a big difference.
Key Takeaways
- You can make your welds look better fast by controlling your travel speed.
- How you hold your welding gun or torch affects the shape of your weld.
- The right welding angle is super important for a nice, even bead.
- Choosing the best welding wire or rod makes a big difference in appearance.
- Keeping your welding technique steady leads to a smoother look.
What Makes a Weld Bead Look Good?
The Goal of a Nice Weld Bead
When we talk about a weld bead’s appearance, we mean how it looks after you’re done welding. A good-looking weld bead is usually smooth, even, and consistent. It has a nice, rippled pattern that shows it was done well.
It shouldn’t have a lot of bumps, dips, or messy spots. For beginners, achieving this can seem like a puzzle. It’s not just about making the metal stick together; it’s about doing it neatly.
Why Beginners Find It Challenging
New welders often face a few common issues. They might move too fast or too slow, leading to beads that are too thin or too wide. Sometimes, the heat might be too high or too low, causing problems.
Holding the welding tool at the wrong angle can also mess up the shape. It takes practice to get a feel for how the metal flows and solidifies. The goal is to make it look as good as it performs.
Easy Steps to Better Weld Bead Appearance
1. Controlling Your Travel Speed
Your travel speed is how fast you move your welding torch or gun along the joint. If you move too quickly, your weld won’t have enough filler metal, and it will look skinny and weak. If you move too slowly, too much metal will build up, and the bead will be wide and lumpy.
Finding the sweet spot is key. You want a consistent speed that lets the metal melt and flow properly.
Think of it like drawing a line. If you drag your pen too fast, the ink won’t come out right. If you go too slow, it might blob.
With welding, you’re aiming for a steady, even pace. Try to watch the puddle of molten metal. It should be a good size, not too big and not too small.
As you practice, you’ll start to feel what the right speed is.
2. Mastering the Stick-Out Distance
The stick-out is the length of the welding wire that sticks out from the tip of your welding gun or torch. This distance matters a lot. If the stick-out is too long, the wire can wobble, and the heat might not be focused.
This can lead to a messy, uneven bead. If the stick-out is too short, it can be hard to see what you’re doing, and you might even damage the tip.
For most common welding jobs, a stick-out of about 1/4 inch to 1/2 inch is a good starting point. Always try to keep it consistent. If you’re welding on a flatter surface, you might use a slightly longer stick-out.
For tight spots or corners, you might need to shorten it a bit. Consistent stick-out helps create a consistent weld shape.
3. Finding the Right Welding Angle
The angle at which you hold your welding torch or gun plays a big role in how the molten metal flows. For most flat welding, you want to tilt the torch slightly forward in the direction you are moving. This is called a “push” angle.
A slight push helps to control the weld puddle and can give you a nice, smooth bead with good penetration.
If you’re welding a joint that’s not flat, like a corner or a vertical seam, you’ll need to adjust your angle. For vertical welds going up, you might use a slight upward tilt. For overhead welding, it’s more about keeping the torch steady and using a slight push.
Experimenting with different angles will show you how they affect the bead’s shape and how the metal lays down.
4. Choosing the Correct Welding Wire or Rod
The type of welding wire or rod you use can also affect the appearance of your weld. Different wires have different melting points, flow characteristics, and give different bead appearances. For example, some wires produce a very smooth bead, while others create more defined ripples.
Make sure you are using the right type of wire for the metal you are welding and for the welding process you are using (like MIG, TIG, or Stick).
Always check the manufacturer’s recommendations for the wire or rod. They will often tell you the best settings to use and what kind of bead to expect. If you’re using MIG welding, the diameter of the wire is also important.
A smaller diameter wire is usually used for thinner metals, while a larger diameter is for thicker metals. The right choice makes a significant difference.
5. Setting the Right Welding Parameters
Welding parameters include things like voltage and amperage (for MIG and Stick welding) or amperage (for TIG welding). These settings control the heat of your weld. If the heat is too low, the metal won’t melt enough, and the bead will be weak and not fused properly.
If the heat is too high, you can burn through the metal, or the weld puddle can become too large and difficult to control, leading to a messy bead.
Most welding machines have charts or guides that suggest starting settings based on the thickness of the metal you are welding and the type of wire or rod you are using. It’s a good idea to start with these recommended settings and then make small adjustments as needed. Watch the weld puddle and listen to the sound of the arc.
These can give you clues about whether your settings are correct.
For instance, if you hear a sputtering or popping sound, your amperage might be too high. If the arc seems weak and the metal isn’t melting well, your amperage might be too low. Finding the right balance for heat is a skill that comes with practice, and it’s essential for a good-looking bead.
6. Maintaining a Steady Hand and Movement
Consistency is your best friend when it comes to weld bead appearance. This means keeping your hand steady while you’re welding and maintaining a smooth, even movement along the joint. If your hand shakes or jerks, it will cause the weld to be uneven.
This can result in wide spots, narrow spots, and a generally messy look.
Try to brace yourself as much as possible. Use your other hand to support your welding arm, or rest your arm on a stable surface if the workpiece allows. Practice moving your hand in a smooth, sweeping motion.
Think about the path the welding torch or gun is taking. Imagine you are tracing a straight line or a smooth curve. The more consistent your movement, the more consistent your weld bead will be.
7. Practicing on Scrap Metal
The best way to get better at welding appearance is to practice. Don’t start on your final project. Find some scrap pieces of metal that are the same type and thickness as what you’ll be working with.
Practice making straight beads, then practice making beads on joints like corners and laps. This allows you to try different settings, angles, and speeds without the pressure of ruining an important piece.
Keep a log of what settings you used for each practice weld and how it turned out. This can help you learn what works best for different situations. Look at the finished beads.
Are they too wide? Too narrow? Too bumpy?
Use this information to make adjustments on your next practice piece. The more you practice, the more intuitive it will become.
Frequently Asked Questions
Question: What is the most important factor for a beginner to focus on for weld appearance?
Answer: For beginners, controlling your travel speed is often the most important factor. Moving too fast or too slow directly impacts how much metal you deposit and the shape of the bead.
Question: How does stick-out affect weld bead appearance?
Answer: The stick-out distance influences how stable the welding arc is and how the filler metal melts. A consistent, correct stick-out helps create a more uniform and controlled weld bead.
Question: Can welding angles really make that much of a difference?
Answer: Yes, welding angles are crucial. Tilting your torch correctly helps control the molten weld puddle and guides the filler metal, leading to a smoother, more consistent bead shape.
Question: What if my weld beads are too bumpy?
Answer: Bumpy weld beads can be caused by too much heat, moving too slowly, or inconsistent travel speed. Try adjusting your welding parameters and focus on a steady, consistent motion.
Question: How can I get a nice, rippled appearance on my welds?
Answer: A consistent, rhythmic movement of your torch, often with a slight oscillation or “weaving” motion, combined with the right travel speed and amperage, can create attractive weld ripples.
Final Thoughts
Improving your weld bead appearance quickly is totally achievable. Focus on steady travel speed, consistent stick-out, and the right welding angles. Always use the correct settings for your metal and wire.
Practicing on scrap pieces lets you learn without pressure. You’ll see your welds get smoother and more uniform with each session. Keep practicing, and you’ll be making great-looking welds in no time.