Figuring out How Do You Set Correct TIG Electrode Angle? can seem tricky when you’re just starting out. It feels like a small thing, but it really changes how your weld looks and how strong it is. Don’t worry, though!
We’ll break it down step-by-step so it’s easy to get right. We’ll show you exactly what to do to make your welds look great and be super solid. Get ready to learn the simple secrets to perfect TIG electrode angles.
Key Takeaways
- The right electrode angle helps melt metal evenly.
- A consistent angle leads to smoother, stronger welds.
- Too much tilt can cause issues like arc wandering.
- Too little tilt might make it hard to control the puddle.
- Adjusting your angle depends on the metal and joint type.
- Practice is key to feeling the correct angle naturally.
Understanding TIG Electrode Angle
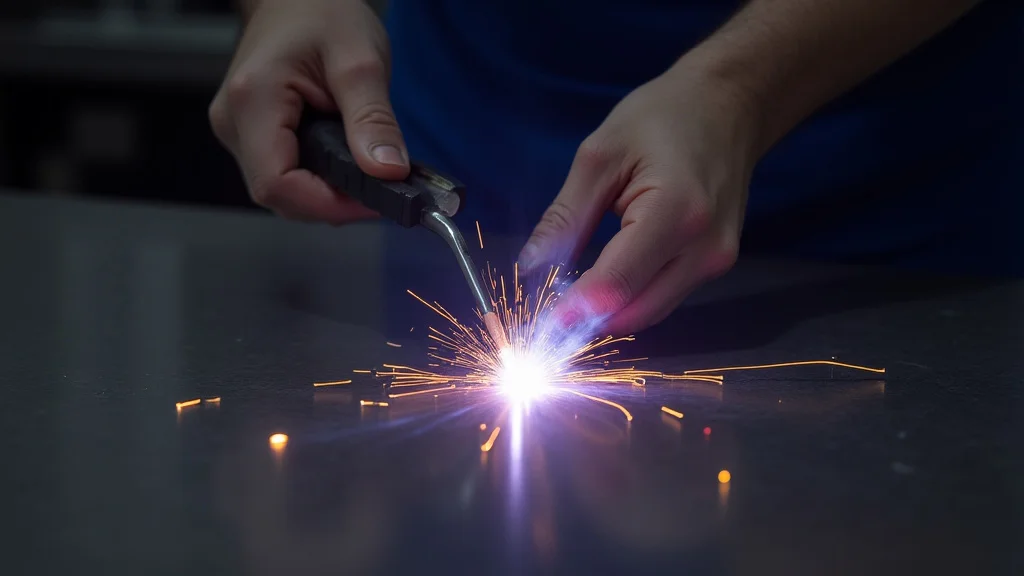
When you’re TIG welding, the angle of your tungsten electrode to the workpiece is super important. It’s not just about holding the torch; it’s about guiding the heat and the molten puddle. Getting this angle right helps you make clean, strong welds every time.
Think of it like drawing with a pencil. If you hold the pencil too straight up or lay it too flat, your lines won’t be smooth or controlled. The same idea applies to TIG welding.
The electrode’s angle directs the welding arc and influences how the metal melts and flows.
Why Does Electrode Angle Matter So Much?
The angle of the TIG electrode affects a few key things. It controls where the heat from the arc goes. It also helps you manage the weld puddle.
Plus, it makes it easier to add filler metal if you’re using it.
If your electrode is angled wrong, you might see:
- Uneven melting of the base metal.
- A weld that is too wide or too narrow.
- Difficulty controlling the molten puddle.
- Problems with arc stability.
- Poor penetration into the metal.
A proper angle helps you get good fusion between the metals you’re joining. It also means you can add filler metal smoothly and without problems.
Common Electrode Angles and Their Effects
Let’s look at a few common angles and what happens when you use them.
The “Push” Angle (Leaning Forward)
When you lean the electrode slightly in the direction you are welding, it’s called a “push” angle. This can help push the molten puddle ahead of the arc.
A slight push angle can sometimes:
- Make the weld bead wider.
- Help you see the puddle better in some situations.
- Be useful on thinner materials where you want less penetration.
However, pushing too much can cause the arc to wander. It can also lead to less penetration, meaning the metals might not fuse as strongly.
The “Pull” Angle (Leaning Backward)
Leaning the electrode slightly back, away from the direction of welding, is a “pull” angle. This angle tends to pull the molten puddle behind the arc.
A slight pull angle is often preferred because it can:
- Provide better control over the weld puddle.
- Allow for deeper penetration into the base metal.
- Help create a narrower, more focused weld bead.
- Result in a stronger weld.
Most TIG welding experts recommend a slight pull angle for general welding. It gives you better control and usually leads to better results, especially on thicker materials or when building up a weld.
The “Perpendicular” Angle (Straight Up and Down)
Holding the electrode perfectly straight up and down, at a 90-degree angle to the workpiece, is a perpendicular angle. While it might seem like the most direct way to weld, it’s often not ideal for TIG.
When the electrode is too straight:
- It can be harder to see the weld puddle clearly.
- The arc might not spread out as evenly.
- It can be more difficult to add filler rod smoothly.
- You might get arc blow, where the arc seems to jump around.
For most TIG welding, holding the electrode perfectly straight up and down is not the goal. A slight angle gives you better control and visibility.
Factors Influencing the Correct Angle
The best electrode angle isn’t always the same. It changes based on what you’re welding and how you’re welding it.
Material Thickness
Thinner materials often benefit from a slightly more angled torch, sometimes closer to parallel with the surface, or a slight push. This helps to spread the heat and avoid burning through. You still want control, but you need to be careful with heat input.
Thicker materials usually require a slight pull angle. This allows for deeper penetration and a more concentrated heat source to fuse the thicker metal effectively. You need to get the heat deep into the joint.
Joint Type
Different joints need different approaches. For a butt weld where two pieces meet edge-to-edge, you might use a fairly standard slight pull angle.
For a fillet weld where two pieces meet at a corner, you might need to adjust your angle slightly to aim the arc into the root of the joint and get good fusion on both pieces of metal. You may tilt the torch slightly so it’s hitting both the vertical and horizontal piece equally.
For lap welds, the angle can be adjusted to ensure you’re melting both overlapping pieces of metal evenly.
Filler Metal
If you’re using filler rod, the electrode angle can influence how easily the filler melts and blends into the weld puddle. A good angle makes it easy to feed the rod into the puddle without it getting in the way of the arc.
Generally, you want the filler rod to touch the molten puddle just ahead of the arc, not the tungsten itself. The electrode angle helps make space for this.
Personal Preference and Comfort
While there are general rules, your own comfort and how you hold the torch also play a role. Some welders naturally find an angle that works best for them through practice. The key is that the angle allows you to see the puddle, control the heat, and add filler smoothly.
Setting the Correct Angle: A Simple Approach
So, how do you actually set it? It’s simpler than you might think.
1. Start with a Slight Pull Angle: For most general TIG welding, aim for a slight backward tilt of the electrode, maybe around 10-15 degrees from being perfectly straight up and down. Imagine you’re gently pulling the arc behind you as you move.
2. Aim for the Weld Puddle: Your primary focus should be on directing the arc where you want the metal to melt. The electrode angle helps you achieve this.
3. Observe the Arc and Puddle: Watch how the arc behaves and how the puddle forms. Is it stable?
Are you getting good melt? If the puddle is spreading too much or you’re not getting enough heat, you might need a slightly different angle.
4. Add Filler Rod Naturally: If you’re using filler, practice feeding it into the puddle. The electrode angle should allow you to do this without the rod getting in the way of the arc or hitting the tungsten.
5. Adjust as Needed: If you’re welding thin sheet metal and burning through, try angling the torch a bit more towards parallel to the surface. If you need more penetration on thick material, a slightly stronger pull angle might help.
Tips for Practice
The best way to get good at setting the electrode angle is to practice. Use scrap pieces of metal. Try different angles and see what happens.
Focus on consistency. Try to hold the same angle for a decent length of weld. Then, try to vary it slightly and notice the difference.
Watch videos. Seeing experienced welders in action can give you a good visual idea of proper torch angles.
Listen to the arc. Sometimes, an unstable arc is a sign that your angle isn’t quite right.
Feel it. Over time, you’ll develop a feel for what the correct angle is. It becomes more intuitive.
Frequently Asked Questions
Question: What is the ideal TIG electrode angle for beginners?
Answer: For most beginners, starting with a slight pull angle, about 10-15 degrees backward from perpendicular, is a good general rule. This offers good puddle control and arc stability.
Question: Can I hold the TIG electrode straight up and down?
Answer: While you can technically hold it straight up and down, it’s usually not ideal. It can make it harder to see the puddle, control the arc, and add filler rod smoothly.
Question: How does the electrode angle affect weld penetration?
Answer: A slight pull angle generally promotes deeper penetration because it directs the heat more effectively into the base metal. Too much of a push angle can reduce penetration.
Question: Should my electrode angle change for different metals like steel and aluminum?
Answer: The basic principles of electrode angle apply to most metals, but the ideal angle might be adjusted slightly depending on heat input needs and puddle fluidity, which can vary between metals.
Question: How do I know if my TIG electrode angle is wrong?
Answer: Signs of a wrong angle include arc wandering, difficulty controlling the molten puddle, uneven weld bead width, poor penetration, or the electrode tungsten touching the filler rod or workpiece.
Final Thoughts
Getting the How Do You Set Correct TIG Electrode Angle? right is all about balance and control. A slight pull angle usually works best for stable welds and good melt. Keep your torch aimed where you want to weld.
Watch the puddle and adjust your tilt a little if needed. Consistent practice helps you feel what’s right. You’ll get the hang of it.