Many people learning to TIG weld find that their arc jumps around or doesn’t stay steady. This can make beautiful welds feel impossible to get. It’s a common frustration when you’re just starting out, but don’t worry!
You can fix this. This guide will give you a simple TIG Welder Inconsistent Arc? Step Fix.
We’ll go through easy steps to get your arc smooth and consistent. Let’s get your TIG welding back on track.
Key Takeaways
- You’ll learn why TIG arcs can be inconsistent for new welders.
- We will cover simple checks you can do to improve your arc.
- You will discover how to adjust your TIG welder settings for a better arc.
- Understand the role of tungsten and shielding gas in arc stability.
- Find out how to practice for a more consistent TIG welding experience.
Why Your TIG Arc Might Be Wobbly
When you’re TIG welding, the arc is like the heart of your weld. It’s the electricity that melts the metal. If this arc is jumpy or inconsistent, it’s hard to make a clean, strong weld.
This is a really common issue for people new to TIG welding. It can feel like you’re not making progress, and that’s discouraging. But there are usually a few simple reasons why this happens, and they’re easy to fix.
Basic Setup Mistakes
Sometimes, the simplest things cause the most trouble. Think about building blocks; if the first one is crooked, the whole tower leans. Your TIG setup is the same way.
Ground Clamp Connection
A loose or poor ground connection is a prime suspect for an inconsistent arc. The electricity needs a good path to flow. If the path is spotty, the arc will be too.
- Make sure your ground clamp is attached to a clean, bare metal surface on your workpiece or welding table.
- Scrape away any paint, rust, or dirt from the connection point.
- Ensure the clamp itself is tight and not damaged.
A good ground helps create a stable electrical circuit. Without it, the arc might flicker or refuse to start properly.
Torch Connections
Your TIG torch has several connections that need to be secure. These include the gas line and the electrical connection to the machine.
- Check that the gas hose is firmly attached to the regulator on the gas bottle and to the TIG machine.
- Make sure the TIG torch cable is plugged securely into the TIG welding machine. A loose connection here can cause all sorts of electrical gremlins.
These connections ensure that power and gas reach your torch smoothly. Any looseness can interrupt the flow and make your arc behave strangely.
Power Supply Issues
The power from your TIG welder is what creates the arc. If this power isn’t right, your arc will suffer.
Amperage Settings
The amperage is the strength of the electrical current. Too high or too low amperage can make the arc difficult to control.
For thin metals, you need less amperage. For thicker metals, you need more. Starting with a setting that’s way off can make the arc sputter or be too wide.
Tip: Always check recommended amperage settings for the thickness and type of metal you are welding. Start with a moderate setting and adjust as needed.
AC Balance (for AC machines)
If you’re using an AC TIG welder (common for aluminum), the AC balance setting is important. It controls how much cleaning action you get versus penetration.
An improper AC balance can make the arc unstable. It might feel too “fuzzy” or too “sharp” and hard to direct. Adjusting this setting can make a big difference in arc stability and the weld puddle.
Frequency Settings (for AC machines)
The frequency on AC TIG welders affects the arc cone. Higher frequencies tend to create a tighter, more focused arc. Lower frequencies give a wider arc.
If your arc feels too spread out and hard to control, increasing the frequency can help. If it feels too narrow and difficult to get into the puddle, a lower frequency might be better. Finding the sweet spot for your material and joint is key.
Tungsten Electrode Problems
The tungsten electrode is what carries the electrical current to the workpiece to create the arc. If your tungsten isn’t in good shape, your arc won’t be either.
Tungsten Type
There are different types of tungsten electrodes, each with specific purposes. Using the wrong type can lead to arc instability.
Common types include:
- Pure Tungsten (Green band): Older type, good for AC but can contaminate easily.
- 2% Thoriated Tungsten (Red band): Very common, good for DC, but thorium is radioactive.
- 2% Ceriated Tungsten (Orange band): Good all-around for AC and DC, low radioactive risk.
- 1.5% Lanthanated Tungsten (Gold band): Similar to Ceriated, great for AC/DC.
- 2% Lanthanated Tungsten (Blue band): Excellent arc starting and stability for AC/DC.
For most general TIG welding, Ceriated or Lanthanated tungstens are excellent choices because they offer good arc stability and ease of use across different machines and currents.
Tungsten Sharpening
How you prepare your tungsten electrode is crucial. For DC welding, you want a sharp, pointed tip. For AC welding (aluminum), you often want a slightly balled or rounded tip.
DC Welding: Grind the tungsten to a long, sharp point. This helps focus the arc. Always grind lengthwise, never across the tungsten, as this can cause it to break off into the weld.
AC Welding: For aluminum, the AC current tends to ball up the tip. You usually start with a fresh, slightly rounded or balled tip. If it gets too sharp, the arc can become unstable or wander.
Some welders will also gently grind it to a more blunt point for AC.
A dull or improperly shaped tungsten will cause a wide, sputtering arc that’s hard to control.
Tungsten Contamination
If your tungsten touches the weld puddle or filler rod, it becomes contaminated. This contamination will cause the arc to become erratic, sputter, and produce dirty welds.
If you suspect contamination:
- Stop welding immediately.
- Pull the torch away.
- You may need to grind a new tip onto the tungsten or replace it entirely.
Keeping your tungsten clean is one of the easiest ways to maintain a stable arc.
Shielding Gas Issues
Shielding gas is like a protective blanket for your weld. It prevents oxygen and other atmospheric contaminants from getting into your molten metal and ruining the weld. It also plays a role in arc stability.
Gas Flow Rate
The amount of gas flowing from your torch is set by a regulator and flowmeter on your gas cylinder. If the flow is too low, you won’t have enough protection.
A low gas flow means the arc might flicker, become unstable, or the weld might appear dirty and porous.
Tip: For most TIG welding with argon, a flow rate of 15-25 cubic feet per hour (CFH) is common. Check your specific application and metal thickness.
Gas Leaks
Anywhere the gas travels from the cylinder to your torch is a potential leak point. Leaks mean less gas gets to your weld, and the arc suffers.
Check for leaks at:
- The connection to the gas cylinder regulator.
- The hose connecting the regulator to the welder.
- The connection at the TIG machine.
- The gas hose inside the TIG torch assembly.
You can use a gas leak detector fluid or simply listen for hissing sounds. A leak means you’re wasting gas and getting poor welds.
Drafts
Even with the right gas flow, drafts from fans, open doors, or air conditioners can blow your shielding gas away. This is especially problematic outdoors or in workshop environments with a lot of air movement.
If you’re welding in a breezy area, try to create a windbreak around your welding area. This ensures the gas stays where it’s needed.
Technique and Practice
Even with perfect equipment, your technique matters a lot. How you hold the torch, move it, and feed filler rod all impact the arc.
Torch Angle
The angle of your TIG torch relative to the workpiece affects the arc and the way the weld puddle forms. A consistent torch angle is important.
Generally, you want the torch held at a slight angle, pointing towards the direction of travel. This helps push the weld puddle and maintain a consistent arc length.
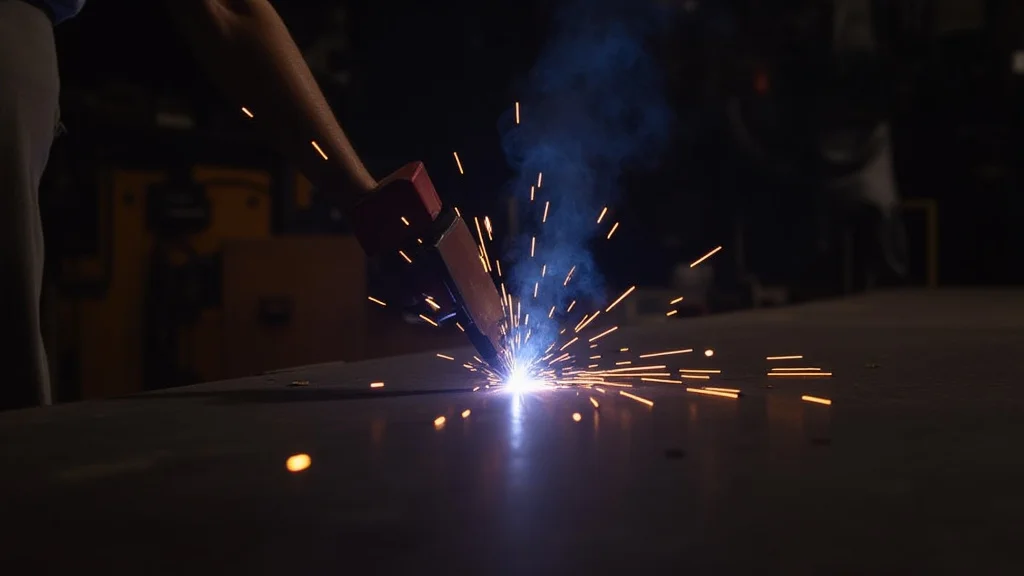
Arc Length
Arc length is the distance between the tip of the tungsten electrode and the surface of the workpiece. This is critical for arc stability and weld quality.
- Too long an arc: Makes the arc very wide, “spindly,” and unstable. It also draws in more atmospheric contaminants, leading to a weaker weld.
- Too short an arc: Can cause the tungsten to dip into the puddle, leading to contamination. It can also make it difficult to add filler rod and control the puddle.
The ideal arc length is usually very short, just enough to have a consistent arc without touching the metal. It should sound like a consistent “hiss” or “buzz,” not a “snap” or “crackle.”
Filler Rod Angle and Placement
If you’re using filler rod, the angle at which you introduce it to the puddle matters. It should be at a relatively shallow angle, almost parallel to the workpiece.
Try to introduce the filler rod to the leading edge of the puddle. If you dip the rod into the arc itself, you can contaminate the tungsten and the rod, leading to a poor arc.
Troubleshooting Your TIG Welder Inconsistent Arc? Step Fix
Let’s put it all together with a practical TIG Welder Inconsistent Arc? Step Fix. Follow these steps when you notice arc problems:
- Check Your Ground: Is it clean and tight? This is the easiest fix.
- Inspect Your Tungsten: Is it clean? Is it sharp (for DC) or appropriately shaped (for AC)? If not, grind or replace it.
- Verify Gas Flow: Make sure your gas is on, the valve on the torch is open, and the flow rate seems right. Listen for leaks.
- Review Machine Settings: Are your amperage and AC balance/frequency (if applicable) set for the metal you’re welding? Consult a chart if unsure.
- Observe the Arc: Is it sputtering, wide, or jumpy? Try to maintain a consistent, short arc length. Keep the torch at a consistent angle.
- Check for Contamination: Did the tungsten touch the puddle or rod? If so, you’ll need to fix the tungsten.
- Shield from Drafts: If there’s any breeze, try to block it.
By systematically checking these points, you can usually pinpoint the cause of your inconsistent arc and correct it.
Frequently Asked Questions
Question: What is the most common reason for a TIG arc to be inconsistent?
Answer: The most common reasons are a poor ground connection, a contaminated or improperly shaped tungsten electrode, or insufficient shielding gas flow.
Question: How do I sharpen my tungsten for TIG welding?
Answer: For DC welding, grind the tungsten to a long, sharp point using a dedicated tungsten grinder. Always grind lengthwise. For AC welding (aluminum), the tip will usually form a ball or slight curve on its own.
Question: Can my TIG welding machine settings cause an inconsistent arc?
Answer: Yes, incorrect amperage, AC balance, or frequency settings can all lead to an unstable or inconsistent arc. Always set your machine according to the metal thickness and type.
Question: What should I do if my tungsten touches the weld puddle?
Answer: Stop welding immediately. Pull the torch away. You will likely need to grind a new point onto the tungsten or replace it entirely to remove the contamination.
Question: How can I tell if I have enough shielding gas?
Answer: You should hear a gentle, consistent hiss from the torch. If you see sputtering, porosity in the weld, or the arc is “blown” away by air, you likely have insufficient gas flow or are in a draft.
Final Thoughts
An inconsistent TIG arc is a common hurdle, but it doesn’t have to stop you. By checking your ground, tungsten, gas, and machine settings, you can easily fix most arc problems. Practice keeping your arc length short and torch angle steady.
These simple checks are your go-to TIG Welder Inconsistent Arc? Step Fix. You’ve got this!